How to Save Zinnia Seed in a Hobby Garden
Seed saving is the moment when a zinnia project becomes more than observation. All season, you have been looking. You watched the first blooms open. You compared colors. You noticed which plants had stronger stems, fuller flowers, better branching, cleaner foliage, or more useful late-season performance. You marked the plants that made you stop.
Seed saving is where those observations become next year’s possibility. It is also where many hobby gardeners accidentally lose the project. Not because zinnia seed is impossible to save. Zinnias are generous. They will often make seed readily if allowed to mature. The problem is that the easiest seed to collect is not always the seed worth saving.
A good zinnia seed-saving system begins long before the seed head is dry.
It begins while the plant is still alive and proving itself.
The end of the season can be misleading. By the time zinnia seed heads are dry, the garden may look tired, tangled, and confusing. The flower that was cream, blush, peach, or antique rose in July may be impossible to identify in September. A seed head from a beautiful selected plant may look almost the same as a seed head from a plant you never meant to save.
Memory will not be as reliable as you think.
That is why good seed saving begins with marking.
When a plant looks promising, mark it while the flower and plant are still showing you why it matters. Use a ribbon, plant tag, stake, flagging tape, or garden marker. Take photos of the bloom, the whole plant, and the label. Write a note while the details are fresh.
A dried seed head is not enough information.
The decision has to come first.
Before saving seed, ask whether the whole plant deserves another season.
A beautiful flower can sit on a weak plant. A full double bloom can appear on a stem that flops. A rare color can belong to a plant that mildews early, branches poorly, or produces only one useful bloom.
That does not mean the flower has no value. It may be worth cutting, photographing, enjoying, or saving separately as an experiment.
But the main seed envelope should be reserved for plants that move the project forward.For a pastel zinnia project, that may mean soft color, useful stems, good bloom form, and enough plant strength to keep going. For a double-bloom project, it may mean fullness that repeats. For an August Survivor project, it may mean plants that remain productive when heat, humidity, and disease pressure make the row difficult.
The seed head should be the result of a choice.
Not the result of whatever happened to be left standing.
The best flowers are often the ones you want to cut.
That is the conflict of seed saving.
If you cut every bloom from the plant you love, the plant cannot continue the project. If a zinnia is important for seed, leave at least one or two heads to mature fully.
You can still cut other stems from a productive plant. You do not have to sacrifice every bloom. But you do need to let selected flowers finish their life cycle.
A seed head needs time.
The fresh bloom will fade. The petals will lose color. The head will become papery, brown, dry, and less attractive. This stage is not pretty, but it is necessary. A plant cannot carry the project forward if you never let it finish.
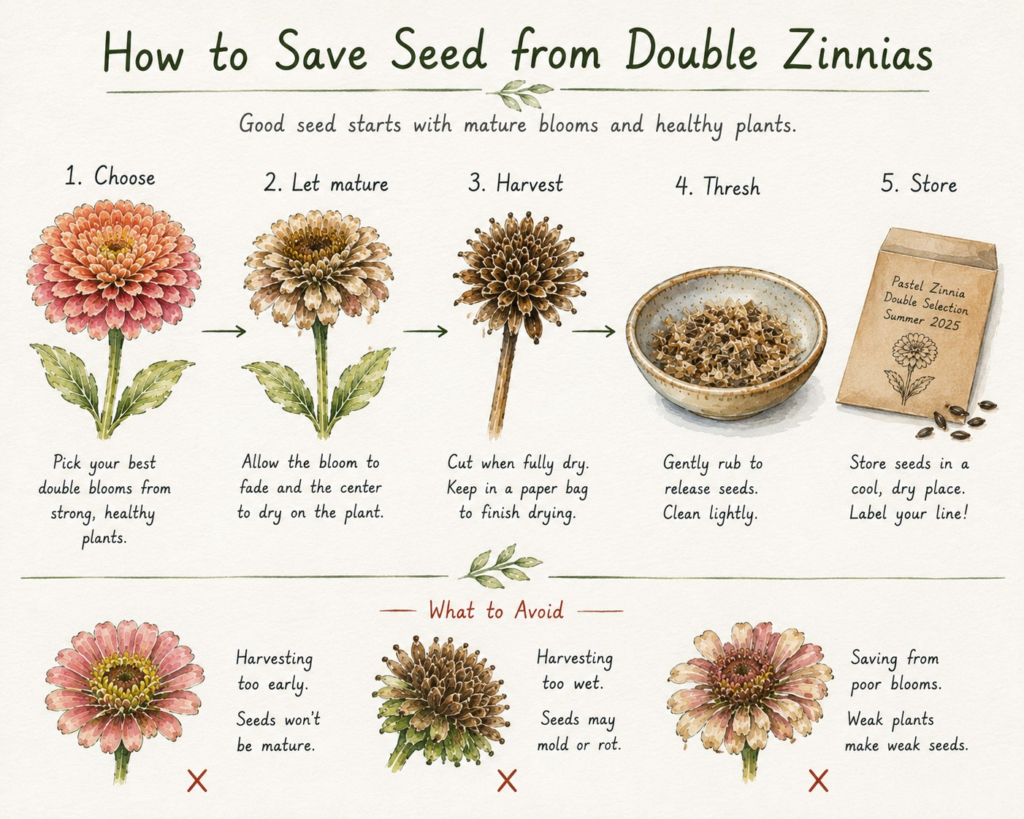
The simplest way to mature zinnia seed is to let selected heads dry on the plant.
This gives the seed more time to develop. The bloom will age, the petals may brown and curl, the center will dry, and the whole head will become firm and papery.
When possible, wait until the seed head is fully mature and dry before harvesting.
This is especially useful in dry weather. If the plant is healthy and the weather is cooperating, leaving the head on the plant usually gives better seed maturity than cutting too early.
But watch the conditions.
If rain is frequent, humidity is high, or disease is spreading, a seed head can move from mature to moldy. A mature seed head is useful. A rotting seed head is not.
What If Frost, Rain, or Disease Comes Too Soon?
Sometimes the season does not cooperate.
A frost may be coming. Rain may continue. The plant may decline before the selected head is fully dry. In that case, choose the most mature heads available and finish drying them indoors.
Cut the stem with some length attached. Bring it inside to a dry, airy place. You can hang stems upside down, lay heads on a screen, place them in open paper bags, or spread them on a tray.
Do not seal damp seed heads in plastic.
Plastic traps moisture, and moisture encourages mold.
“Early harvest — possibly immature.”
That note may explain lower germination later. Honest labels are more valuable than perfect-looking envelopes.
Moisture is one of the main enemies of saved seed.
A seed head that feels damp, smells musty, or shows visible mold should not be stored with your best seed. One bad head can cause trouble for the rest of the envelope.
Harvest on a dry day when possible.
Let seed heads dry fully before storage.
Use paper bags or paper envelopes while drying.
Spread heads out instead of piling them deeply.
Keep drying seed somewhere with airflow.
Avoid sealed plastic until you are certain the seed is fully dry.
Seed saving is partly patience.
Dry seed is safe seed.
A dried zinnia head can be confusing the first time you pull one apart. It contains dried petals, chaff, disc material, and seed. Not everything that looks like seed is good seed.
Zinnia seeds are usually attached to the base of the dried florets. Some may be attached to the base of the outer petal-like ray florets. Some may be found in the center disc area. Depending on the flower form, some seeds may be plump and obvious, while others may be thin, empty, or immature.
Good seed often feels more substantial.
Empty or immature pieces may be thin, papery, and light.
You do not need to become perfect at sorting in the first year. Your hands will learn. After a few dry heads, you will begin to feel the difference between filled seed and dry flower debris.
Do You Need to Separate Ray Seed and Disc Seed?
Some zinnia growers separate ray-floret seed from disc-floret seed because they are curious about whether seed position affects the next generation. That can be an interesting experiment.
But beginners do not need to make seed saving more complicated than necessary.
The first priority is choosing the right plant.
The second priority is saving mature, dry seed with a useful label. Separating seed by position can come later if you enjoy that level of detail. A careful envelope from the right plant is more valuable than a perfectly separated envelope from the wrong plant.
Once the heads are dry, cleaning can be simple.
Work over a tray, plate, paper towel, or sheet of paper. Pull apart the dry head gently. Remove large pieces of petals and chaff. Keep the mature-looking seed.
If you are not sure, save a little extra and sort again later.
Do not worry about making the seed look commercially cleaned. A home seed envelope can contain a little chaff. The goal is not cosmetic perfection. The goal is mature, dry, labeled seed from a plant worth saving.
If the seed is still not fully dry after cleaning, leave it spread out for a few more days before closing it into an envelope or container.
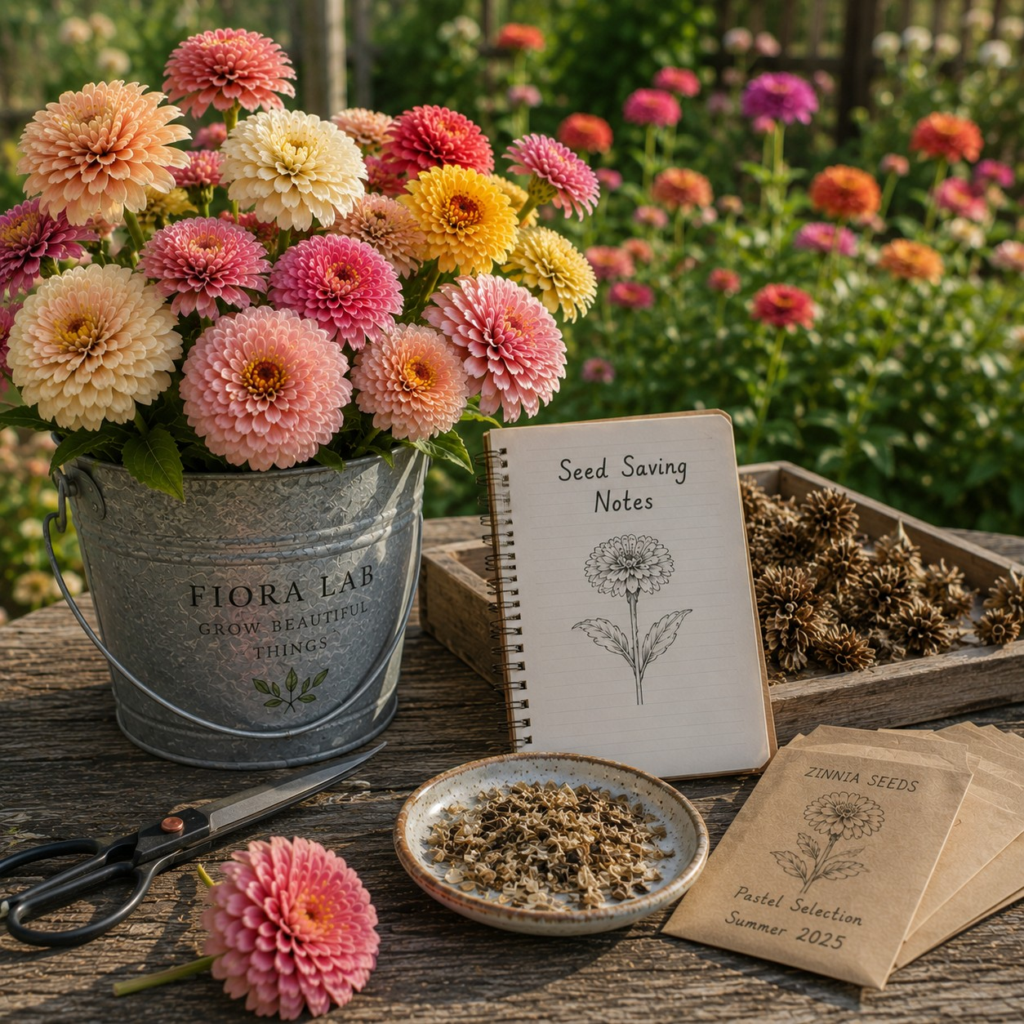
The label is part of the seed.
Without a label, saved seed loses much of its value.
Plant or project name.
Year.
Color.
Form.
Reason for saving.
Any warning or uncertainty.
For example:
“Main Pastel Line — 2026 — cream/blush/peach — best soft plants.”
“Purple Edge — 2026 — cream bloom, faint edge — save separately.”
“Strong Stem Maybe — 2026 — soft peach, semi-double, good neck.”
“Early Harvest — 2026 — possible low germination.”
“August Survivor — 2026 — still blooming late, ordinary color.”
A good label does not need to be long. It needs to tell next year’s gardener what this year’s gardener knew.
Do not put every interesting seed head into one envelope.
Use categories.
A main envelope is for plants that clearly fit the project direction. If you are selecting for soft pastel color, the main envelope should contain seed from the best soft-colored plants that also had useful plant traits.
A separate envelope is for one plant or one trait you want to test on its own.
Rare colors.
Purple edges.
Unusual centers.
Strong stems in the wrong color.
Excellent double blooms with a weakness.
Late-season survivors.
Plants that are interesting but not ready for the main line.
This gives you room for curiosity without confusing the whole population.
This may be the most important rule.
Do not save seed from every zinnia.
If you save seed from everything, the population does not learn your direction. You may carry forward weak stems, harsh colors, early mildew, poor branching, ordinary singles, and plants you did not actually want.
Seed saving is not only preservation.
It is selection.
For a soft pastel project, save from soft plants. For a double-bloom project, save from the fuller useful plants. For a strong-stem project, save from plants that can actually hold the bloom. For an August Survivor project, save from plants that still look alive and useful when the row is tired.
A plant can be beautiful and still not get a seed envelope.
Enjoy every flower.
Save with intention.
Once seed is fully dry, store it in a way that protects it from heat, humidity, light, and confusion.
Place dry seed in a labeled paper envelope.
Let the envelope sit open or loosely closed for a little longer if you are unsure about dryness.
When fully dry, store envelopes in a sealed jar, box, or container.
Add a silica packet if available.
Keep the container cool, dry, and dark.
Do not store seed in a hot shed, humid garage, or sunny windowsill.
The storage method does not need to be fancy. It needs to be consistent.
The most important words are still: dry, labeled, and protected.
Once seed is fully dry, store it in a way that protects it from heat, humidity, light, and confusion. A practical home system:
Place dry seed in a labeled paper envelope.
Let the envelope sit open or loosely closed for a little longer if you are unsure about dryness.
When fully dry, store envelopes in a sealed jar, box, or container.
Add a silica packet if available.
Keep the container cool, dry, and dark.
Do not store seed in a hot shed, humid garage, or sunny windowsill.
The storage method does not need to be fancy. It needs to be consistent.
The most important words are still: dry, labeled, and protected.
Grow the row.
Choose one project direction.
Mark promising plants while they are alive.
Photograph the bloom and the whole plant.
Leave one or two selected heads to mature.
Let seed heads dry on the plant when possible.
Harvest dry heads on a dry day.
Finish drying indoors if needed.
Avoid sealed plastic while seed is still moist.
Pull apart dry heads over a tray.
Save mature-looking seed.
Label envelopes honestly.
Keep main line and special plants separate.
Store cool, dry, dark, sealed, and labeled.
Grow the next generation and select again.
That is enough to begin.
A zinnia seed head is not just dry garden debris.
It is a record.
It tells next year’s garden what you decided this year. It carries the mother plant, the unknown pollen story, the season’s weather, the bees’ movement, and your own eye.
The seed may not return exactly as expected. It may surprise you. It may disappoint you. It may give you one plant worth seeing again.
That is the work.
Grow. Observe. Select. Save. Replant. Improve.
The seed envelope is not the end of the season.
It is the beginning of the next question.
Fiora Lab zinnia seed projects are built around intentional backyard selection. Grow the population, mark the plants that matter, leave selected heads to mature, and save seed only from plants that deserve another season.
For rare traits, use separate envelopes. For the main line, save from plants that clearly move the project forward.